【Gitlab CI/CD】002 认识 .gitlab-ci.yml
runner 可以看成是 24 小时不休息的工人👷🏻♂️,一直监视着 Gitlab 上指定项目,一旦有人提交了代码,runner 就要开始干活了,具体干什么活,就看项目根目录下 .gitlab-ci.yml 这个文件里需要做什么了。
英文好的可以直接看 CI/CD YAML syntax reference 官方文档,本文结合 dkvrius 使用心得记录常用关键词。
目录:
- stages
- stage
- script
- before_script
- after_script
- only
- rules
- when
- image
- default
- tags
- variables
- artifacts
- dependencies
- cache
- environment
stages
生产环境可能会有很多个 Job,如下配置文件有四个 Job,Lint Test 写在 Build App 之前,但实际运行时会先跑 Build App,成功后再跑 Lint Test,如果前一个 Job 失败了,则后面的 Job 不会继续执行。
Lint Test:
  stage: test
  script:
    - echo "Runnig lint testing..."

Unit Test:
  stage: test
  script:
    - echo "Running unit tests...."

Build App:
  stage: build
  script:
    - echo "Running build...."

Deploy App:
  stage: deploy
  script:
    - echo "Running deploy ...."
配置文件中有个关键词叫 stages,默认值如下,可以看到 build 在 test 之前,这就解释了为什么上面先跑 Build App 再跑 Lint Test。
stages:
  - build
  - test
  - deploy
为什么是这个顺序?
很多编译型编程语言如 Java,源码是没法直接运行的,需要先 build 成可执行文件,才能进行 test 操作。
对于 Javascript 和 Python 这种解释型编程语言来说,源码是可以直接进行 test 操作,测试没问题再进行 build 才是正确的逻辑。
我们可以显式添加 stages 关键词,并修改排序将 test 放到 build 前面。
stages:
  - test
  - build
  - deploy

Lint Test:
  stage: test
  script:
    - echo "Runnig lint testing..."

Unit Test:
  stage: test
  script:
    - echo "Running unit tests...."

Build App:
  stage: build
  script:
    - echo "Running build...."

Deploy App:
  stage: deploy
  script:
    - echo "Running deploy ...."
stage
如下配置,可以看到每个 Job 都指定了 stage 值。
Lint Test:
  stage: test
  script:
    - echo "Runnig lint testing..."

Unit Test:
  stage: test
  script:
    - echo "Running unit tests...."

Build App:
  stage: build
  script:
    - echo "Running build...."

Deploy App:
  stage: deploy
  script:
    - echo "Running deploy ...."
Lint Test 和 Unit Test 的 stage 值都是 test,表示这两个 Job 是并列关系,不是顺序关系,会同时运行,如下图。

为什么配置文件中 Lint Test 写在 Build App 之前,但是上图中会先执行 build,再执行 test,可以参阅 stages。
默认 stages 只有 build、test、deploy 三个阶段,如果要加一个新的阶段 stage: install,那就必须显式添加 stages,在 stages 中也要添加 install 才行,否则会报错。
stages:
  - install
  - test
  - build

Install App:
  stage: install
  script:
    - echo "Installing dependencies..."
    - npm ci
script
script 中文意思是脚本,就是实际要做什么事情。比如 Build App 这个 Job 的任务是打包代码,在前端项目中就会先执行 npm install 安装依赖,再执行 npm run build 打包代码,一行执行一条命令。
Build App:
  stage: build
  script:
    - echo "Running build...."
    - npm install
    - npm run build
每个 Job 都有一个隐藏的操作:把最新代码 pull 下来,这个不需要在 script 里单独写了,Gitlab 会自动帮我们完成。
before_script
执行顺序:artifacts -> before_script -> script -> after_script
如果是在 default 中定义 before_script,那么每一个 Job 的 script 执行之前都会先执行 before_script。
使用 before_script 示例:
在终端中打印信息,可以使用 ANSI 转义码改变文字颜色,如下图:

可以在 before_script 中使用变量定义 ANSI 转义码,然后在 script 中直接使用变量;
job:
  before_script:
    - TXT_RED="\e[31m" && TXT_CLEAR="\e[0m"
  script:
    - echo -e "${TXT_RED}This text is red,${TXT_CLEAR} but this part isn't${TXT_RED} however this part is again."
    - echo "This text is not colored"
after_script
执行顺序:artifacts -> before_script -> script -> after_script
如果是在 default 中定义 after_script,那么每一个 Job 的 script 执行之后都会执行 after_script。
job:
  script:
    - echo "An example script section."
  after_script:
    - echo "Execute this command after the `script` section completes."
only
only 关键字现在不使用了,GitLab 官方现在更推荐使用功能更强大、逻辑更清晰的 rules 关键字来替代它。
场景1:针对特定分支或标签。如下配置,每当 main 分支有变化时才会跑 deploy_job 这个 Job。
deploy_job:
  script: echo "Deploying"
  only:
    - main
场景2:针对合并请求。如下配置,每当有合并请求时才会跑 test_job 这个 Job。
test_job:
  script: echo "Testing MR"
  only:
    - merge_requests
场景3:文件内容改变时触发。如下配置,只有 Dockerfile 和 docker/scripts/* 文件改变时才会跑 docker_build 这个 Job。
docker_build:
  script: docker build -t my-app .
  only:
    changes:
      - Dockerfile
      - docker/scripts/*
rules
如果你的配置文件中还在使用 only 关键字,Gitlab 官方建议改成 rules 关键字。
场景1:针对特定分支或标签。如下配置,每当 main 分支有变化时才会跑 deploy_job 这个 Job。
deploy_job:
  script: echo "Deploying"
  rules:
    - if: '$CI_COMMIT_REF_NAME == "main"' # 匹配 main 分支
场景2:针对合并请求。如下配置,每当有合并请求时才会跑 test_job 这个 Job。
test_job:
  script: echo "Testing MR"
  rules:
    - if: '$CI_PIPELINE_SOURCE == "merge_request_event"' # 使用预定义变量判断管道来源
场景3:文件内容改变时触发。如下配置,只有 Dockerfile 和 docker/scripts/* 文件改变时才会跑 docker_build 这个 Job。
docker_build:
  script: docker build -t my-app .
  rules:
    - changes: # 检查文件变更
        - Dockerfile
        - docker/scripts/*
      when: on_success # 当有变更时,作业在之前阶段成功后执行
    - when: never # 如果没有匹配到变更规则,则作业不加入流水线
when
when 的含义是满足条件时才会执行当前 Job,有如下值:
- on_success:默认值。当前 Job 前面的 Job 全部运行成功才会执行当前 Job;
- on_failure:当前 Job 前面的 Job 只要有一个失败了都会执行当前 Job;
- always:不管前面的 Job 成功还是失败,当前 Job 总会执行;
- manual:需要手动点击才会运行当前 Job;
Job 的执行顺序是由 stages 控制的。
如下示例:只要前面的 Job 有一个失败,就会执行 cleanup_build_job 这个 Job。
cleanup_build_job:
  stage: cleanup_build
  script:
    - cleanup build when failed
  when: on_failure
如下示例:往生成环境发布代码是件很严肃的事情,通常会设置手动触发才会执行 Job。
deploy_production:
  stage: deploy
  script:
    - make deploy
  when: manual
image
指定 Job 使用什么 Docker 镜像。
Build App:
  image: node:24
  stage: build
  script:
    - echo "Running build...."
    - npm install
    - npm run build
default
如下配置,每个 Job 都有 image 字段,要是能在一个地方定义 image,每个 Job 直接继承就好了,default 就是做这件事的。
Lint Test:
  image: node:lts
  stage: test
  script:
    - echo "Runnig lint testing..."

Unit Test:
  image: node:lts
  stage: test
  script:
    - echo "Running unit tests...."

Build App:
  image: node:lts
  stage: build
  script:
    - echo "Running build...."
修改后如下,Job 如果没有定义 image,默认会使用 default 里定义的 image。Build App 自己定义了 image,就会使用自己定义的 image。
default:
  image: node:lts

Lint Test:
  stage: test
  script:
    - echo "Runnig lint testing..."

Unit Test:
  stage: test
  script:
    - echo "Running unit tests...."

Build App:
  image: node:24
  stage: build
  script:
    - echo "Running build...."
并不是所有关键词都可以写到 default 里的,只有下面这些可以写到 default 里减少重复配置:
- after_script
- artifacts
- before_script
- cache
- hooks
- id_tokens
- image
- interruptible
- retry
- services
- tags
- timeout
tags
指定使用哪个 runner 来执行当前 Job。
项目页面 -> Settings -> CI/CD -> Runners。可以看见创建了哪些 runner,每个 runner 在 创建 时都需要填写 tags,当时填的 tags 就在 .gitlab-ci.yml 文件中使用。
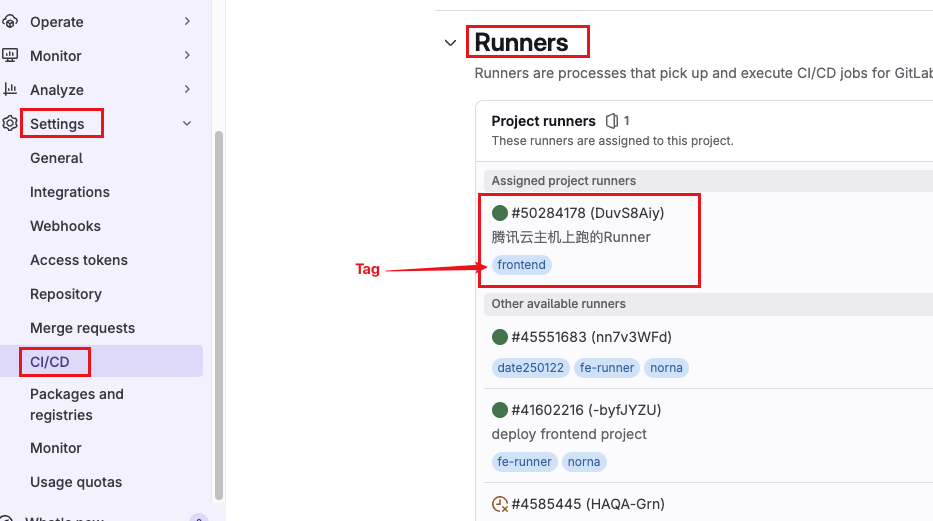
如上图,我创建了很多个 runner,其中第一个 runner 的 tag 为 frontend。
如下示例,两个 Job 都使用标签为 frontend 的 runner 来执行。
Unit Test:
  stage: test
  script:
    - echo "Running unit tests...."
  tags:
    - frontend

Build App:
  image: node:24
  stage: build
  script:
    - echo "Running build...."
  tags:
    - frontend
variables
- 自定义变量
可以在 Job 中自定义变量,然后 script 中使用变量。
review_job:
  variables:
    DEPLOY_SITE: "https://dev.example.com/"
    REVIEW_PATH: "/review"
  script:
    - deploy-review-script --url $DEPLOY_SITE --path $REVIEW_PATH
如果在 default 中定义变量,那么所有 Job 都可以使用该变量。
default:
  variables:
    DEPLOY_SITE: "https://dev.example.com/"
    REVIEW_PATH: "/review"
- CI/CD Variables
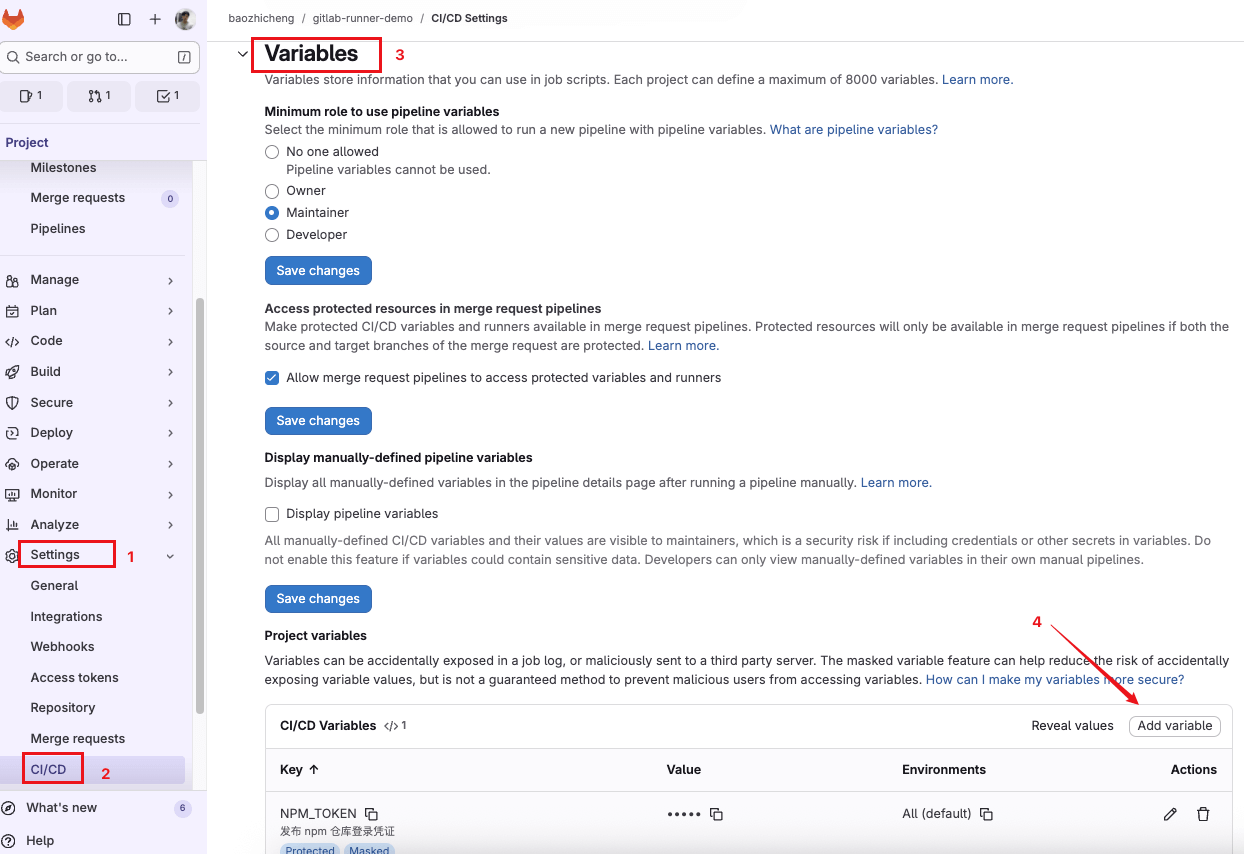
一些敏感信息如 token、密码不要直接写在 yaml 配置文件中。进入 Gitlab 项目页面 -> Settings -> CI/CD -> Variables 中添加变量,然后在 Job 中使用。
如上图在 Gitlab 项目的配置中添加了变量 NPM_TOKEN,在 yaml 配置文件中像使用普通变量一样使用。
publish-npm:
  stage: deploy
  script:
    - echo "//registry.npmjs.org/:_authToken=${NPM_TOKEN}" > .npmrc
    - npm install
    - npm run build
    - npm publish
- Gitlab 内置变量
Gitlab 提供了一些 内置变量,可以在 Job 中直接使用。
如下配置:
- $CI_COMMIT_REF_NAME:当前分支名;
- $CI_COMMIT_SHA:当前提交的 commit hash;
build_app:
  stage: build
  script:
    - echo "Running build...."
    - echo $CI_COMMIT_REF_NAME
    - echo $CI_COMMIT_SHA
artifacts
如下配置:build_app 打包前端代码会生成 dist 目录,在 deploy_app 中使用 ls dist 是报错 ls: cannot access ‘dist’: No such file or directory。
原因是:Job 与 Job 之间是完全隔离的,默认是无法进行文件共享的。
build_app:
  stage: build
  script:
    - npm run build

deploy_app:
  stage: deploy
  script:
    - ls dist
如果我们想要 Job 与 Job 之间进行文件共享,可以使用 artifacts 进行设置。
修改配置如下:在 build_app 中添加 artifacts 配置,在 paths 中可以添加多个需要共享的文件或目录,目录后面要加斜线。
build_app:
  stage: build
  script:
    - npm run build
  artifacts:
    paths:
      - dist/

deploy_app:
  stage: deploy
  script:
    - ls dist
现在再运行 pipeline 就不会报错了。
build_app 执行完之后,会将 dist 目录上传到 Gitlab -> Build -> Artifacts 中,后续运行的所有 Job 都会自动从这里下载文件,以达到不同 Job 文件共享的目的。如果说后续有些 Job 不需要下载共享文件,可以通过 dependencies 字段改变下载行为。

注意📢:NodeJS 的 node_modules 目录千万别使用 artifacts 进行共享,因为 node_modules 文件太大了,上传时间和下载时间遥遥无期,Pipeline 会一直卡在那不动,可以使用 cache 来处理 node_modules 问题。
dependencies
前面介绍的 artifacts 是解决不同 Job 之间可能会有文件共享的情况。
一个非常常见的部署场景:写了一个软件,支持多个操作系统:
- MacOS 编译包(Job: build osx) -> MacOS 测试(Job: test osx);
- Linux 编译包(Job: build linux) -> Linux 测试(Job: test linux);
dependencies 字段让每个测试 Job 去下载对应系统的编译包。
build osx:
  stage: build
  script: make build:osx
  artifacts:
    paths:
      - binaries/

build linux:
  stage: build
  script: make build:linux
  artifacts:
    paths:
      - binaries/

test osx:
  stage: test
  script: make test:osx
  dependencies:
    - build osx

test linux:
  stage: test
  script: make test:linux
  dependencies:
    - build linux
对于 artifacts 来说,理论上之后的 Job 默认都会下载之前 Job 的 artifacts 文件,如果不想下载文件,可以设置 dependencies 为空数组。
build osx:
  stage: build
  script: make build:osx
  artifacts:
    paths:
      - binaries/

deploy:
  stage: deploy
  script:
    - echo "Deploying..."
  dependencies: []
cache
如下示例,每个 Job 的 script 都有一个命令 npm install 安装依赖,这是因为 Job 与 Job 之间是隔离的,这样编写明显会影响自动化的速度。
Lint Test:
  stage: test
  script:
    - echo "Runnig lint testing..."
    - npm install
    - npm run lint

Unit Test:
  stage: test
  script:
    - echo "Running unit tests...."
    - npm install
    - npm run test

Build App:
  stage: build
  script:
    - echo "Running build...."
    - npm install
    - npm run build
TODO
environment
定义 Job 部署到哪个环境。
如下配置使用了 environment 关键字,定义了环境名称为 production,url 一般填写项目的访问地址,没有的话可以不写。
Deploy App:
  stage: deploy
  script:
    - echo "Deploying app...."
  environment:
    name: production
    url: https://www.baidu.com
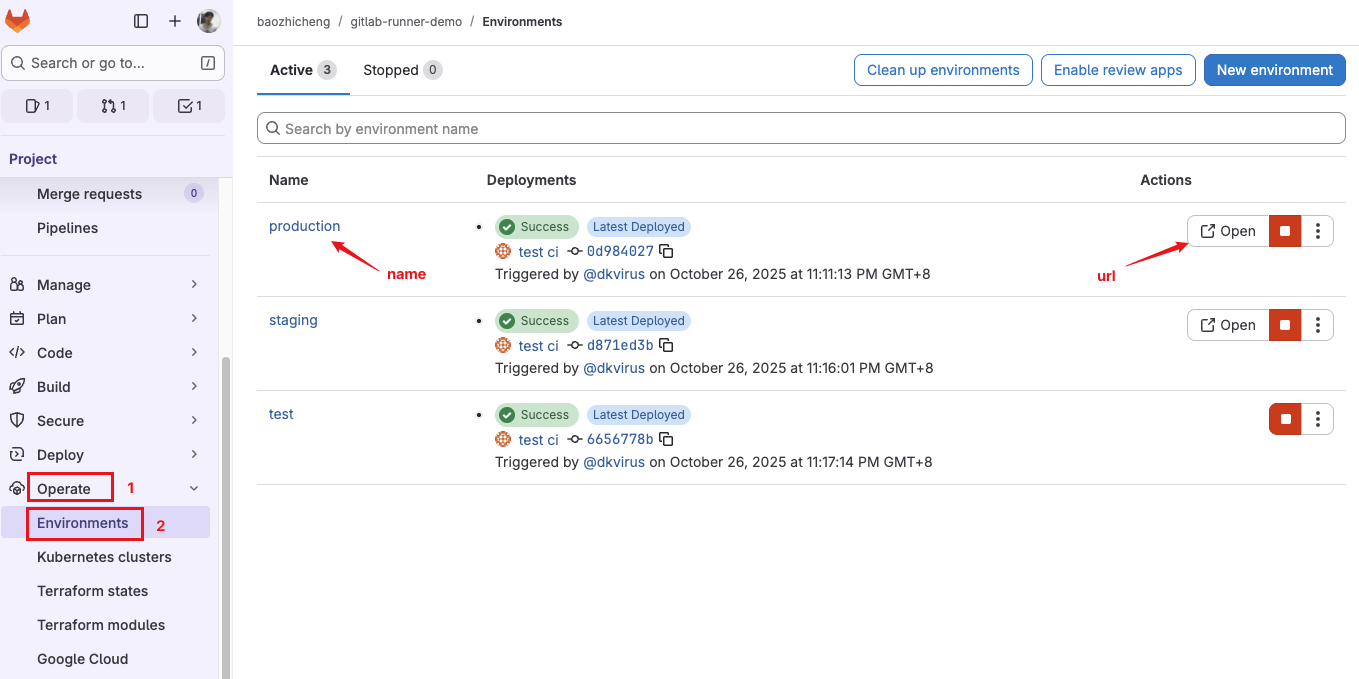
跑完 Pipeline,进入 Gitlab 项目页面 -> Operate -> Environments 中可以看到定义的环境。
实际开发中可能会往不同的环境发布版本,在这个页面可以清晰的看到每个环境的部署状态,如果配置文件中添加了 url 配置,页面会有个 Open 按钮,点击会跳转到对应环境的网址。
↶ 返回首页 ↶