【Python 第三方库】jinja2
目录:
- jinja2 模块介绍
- 渲染变量
- 注释代码
- 定义变量
- 长度过滤器: length
- 数值过滤器: round,int
- 条件语句
- 循环语句
- 过滤器
- 从文件加载模板
- 继承模版
- 宏——自定义组件
- 包含——复用片段
我的博客是用 Hexo 写的,Hexo 的模版引擎和 Jinja2 部分语法重叠,导致有些代码无法正常显示,只能通过图片的方式进行表述。
jinja2 模块介绍
jinja2 是 Python 中流行的模板引擎,用于生成动态的 HTML、XML 和其他文本格式。
安装模块,注意,官方包名是 Jinja2,首字母大写,拼写错误会导致安装失败。
$ pip3 install Jinja2
渲染变量
{{ ... }}:用于表达式,将变量的值打印到模板输出中。
from jinja2 import Template

# 1. 从字符串创建模板
template = Template('Hello {{ name }}!')
# 2. 渲染模板,传入上下文变量
output = template.render(name='John Doe')
print(output)
# 输出:Hello John Doe!

# 也可以渲染多个变量
tm = Template("My name is {{ name }} and I am {{ age }}")
msg = tm.render(name='Peter', age=34)
print(msg)
# 输出:My name is Peter and I am 34

# 使用对象
class Person:
    def __init__(self, name, age):
        self.name = name
        self.age = age

person_obj = Person('Peter', 34)
tm2 = Template("My name is {{ per.name }} and I am {{ per.age }}")
msg2 = tm2.render(per=person_obj)
print(msg2)
传参如果是字典,在模版内是通过 变量名.属性名 方式调用,和 Python 中 变量名['属性名'] 的方式略有不同。
from jinja2 import Template

# 使用字典
person_dict = {'name': 'Person', 'age': 34, 'address': {'city': 'Shanghai'}}
tm = Template("My name is {{ per.name }} and I am {{ per.age }}, I live in {{ per.address.city }}")
msg = tm.render(per=person_dict)
print(msg)
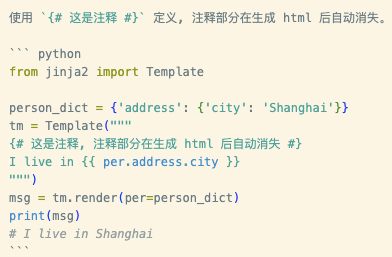
注释代码
定义变量
使用 {% set 变量名=表达式 %} 定义变量,简化模版代码:
from jinja2 import Template

person_dict = {'name': 'Person', 'age': 34, 'address': {'city': 'Shanghai'}}
tm = Template("""
{% set city = per.address.city %}
{% set name='dkvirus' %}
{% set people='adult' if per.age > 18 else 'child' %}
I live in {{ city }}
""")
msg = tm.render(per=person_dict)
print(msg)
# I live in Shanghai
长度过滤器: length
字符串的长度或者列表的长度都可以使用 length 过滤器获得,语法是 变量名|length,相当于 Python 中的 len(变量名)。
from jinja2 import Template

person_dict = {'name': 'dkvirus', 'hobbies': ['reading', 'coding']}
tm = Template("""
name is {{ 'long-text' if name|length > 5 else 'short-text' }}
hobbies length: {{ per.hobbies|length }}
""")
msg = tm.render(per=person_dict)
print(msg)
# name is short-text
# hobbies length: 2
数值过滤器: round,int
数值保留指定小数位数
round(length) 四舍五入保留小数位数。
- round(1) 四舍五入保留1位小数;
- round(0) 四舍五入保留0位小数, 但结果仍是浮点数;如果希望是四舍五入后变成整型,可以再加一个 int 过滤器;
int 转换为整型数值。
from jinja2 import Template

person_dict = {'score': 1234.567}
tm = Template("""
直接保留整数: {{per.score|int}}
四舍五入后保留1位小数: {{per.score|round(1)}}
四舍五入后保留0位小数: {{per.score|round(0)}}
四舍五入后保留整数: {{per.score|round(0)|int}}
""")
msg = tm.render(per=person_dict)
print(msg)
# 直接保留整数: 1234
# 四舍五入后保留1位小数: 1234.6
# 四舍五入后保留0位小数: 1235.0
# 四舍五入后保留整数: 1235
数值转换为百分数
from jinja2 import Template

person_dict = {'math': 0.123}
tm = Template("""
使用乘法和 round 过滤器实现小数转百分数: {{(per.math * 100) | round(1)}}%
""")
msg = tm.render(per=person_dict)
print(msg)
# 使用乘法和 round 过滤器实现小数转百分数: 12.3%
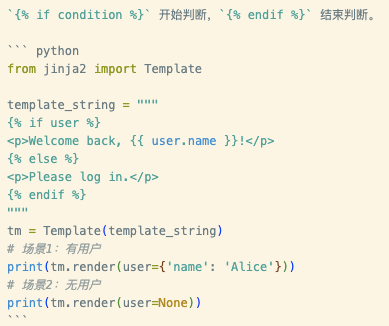
条件语句
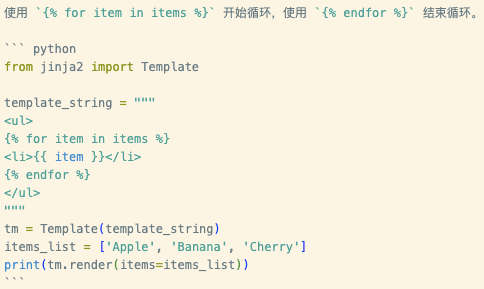
循环语句
常见给表格奇数行或偶数行添加不一样的背景颜色,俗称斑马条纹,此时需要知道循环的索引。
在循环中是没有索引变量的,Jinja2 中提供了 loop 对象来获取索引对象以及想关属性:
- loop.index 索引值,从 1 开始;
- loop.index0 索引值,从 0 开始;
- loop.first 是否是循环中第一个元素,返回 True/False;
- loop.last 是否是循环中最后一个元素,返回 True/False;
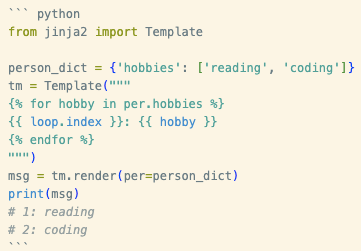
如果要判断是否是偶数列,可以直接使用 loop.index is even 进行判断。
过滤器
常用过滤器:
- lower 转小写;
- trim 去首尾空格;
- striptags 删除 HTML 标签;
- join 列表拼接;
- safe 过滤器表示不对该变量进行 HTML 转义;
from jinja2 import Template

template_string = """
<p>Original: {{ name }}</p>
<p>Upper: {{ name|upper }}</p>
<p>Title: {{ name|title }}</p>
<p>Truncated: {{ sentence|truncate(20) }}</p>
"""

tm = Template(template_string)
print(tm.render(name='john doe', sentence='This is a very long sentence that needs to be shortened.'))
从文件加载模板
实际项目中,模板通常存储在独立的目录中。
from jinja2 import Environment, FileSystemLoader

# 创建一个环境,指定模板文件夹
env = Environment(loader=FileSystemLoader('./templates'))
# 从环境加载模板文件
template = env.get_template('my_template.jinja2')
# 渲染模板
output = template.render(name='Alice', items=['Task1', 'Task2'])
print(output)
规范的目录结构如下:
templates/
├── base.html              # 基础布局
├── components/            # 组件目录
│   ├── macros.html       # 宏定义
│   ├── header.html       # 头部组件
│   ├── footer.html       # 底部组件
│   ├── sidebar.html      # 侧边栏组件
│   ├── modal.html        # 弹窗组件
│   └── cards/            # 卡片组件目录
│       ├── product_card.html
│       ├── user_card.html
│       └── article_card.html
├── partials/             # 部分模板片段
│   ├── pagination.html
│   ├── breadcrumb.html
│   └── alerts.html
└── pages/                # 页面模板
    ├── home.html
    ├── products.html
    └── user_profile.html
base.html 可以放最外层页面框架,包含公共样式和字体。
<!DOCTYPE html>
<html lang="en">
<head>
    <meta charset="UTF-8">
    <meta name="viewport" content="width=device-width, initial-scale=1.0">
    <title>Document</title>
    <link
        href="https://fonts.googleapis.com/css?family=Nunito+Sans:200,300,400,600,700,800,900&display=swap&subset=latin-ext"
        rel="stylesheet"
    />
    <link rel="stylesheet" href="../css/fonts.css">
</head>
<body>
    {% block content %}{% endblock %}
</body>
</html>
继承模版
基础模板 base.html:
<!doctype html>
<html lang="en">
<head>
    <meta charset="UTF-8">
    <title>{% block title %}默认标题{% endblock %}</title>
</head>
<body>
    <header>这是页眉</header>
    <main>
        {% block content %}{% endblock %}
    </main>
    <footer>这是页脚</footer>
</body>
</html>
child.html: 使用 extends 表明继承自 base.html
{% extends "base.html" %}
{% block title %}{{ page_title }}{% endblock %}
{% block content %}
    {{ content|safe }}
{% endblock %}
子模版可以这样写:
from jinja2 import Environment, FileSystemLoader

# 创建环境,指定模板所在目录
env = Environment(loader=FileSystemLoader('.'))
# 获取子模板(它会自动处理继承关系)
template = env.get_template('child.html')
output = template.render(page_title='子页面', content='<p>这是子页面的具体内容。</p>')
print(output)
宏——自定义组件
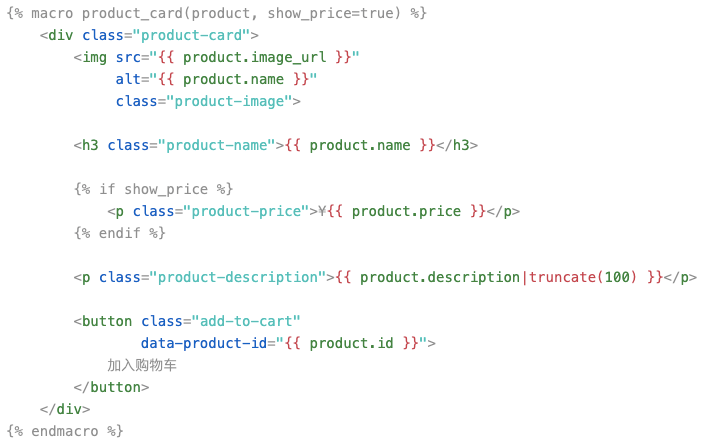
定义宏 macro.html, 下面示例中定义了 product_card 宏/组件。
在其它模版中使用宏:
{% from 'macros.html' import product_card %}


<div class="product-list">
    {% for product in products %}
        {{ product_card(product) }}
    {% endfor %}
</div>


{{ product_card(featured_product, show_price=false) }}
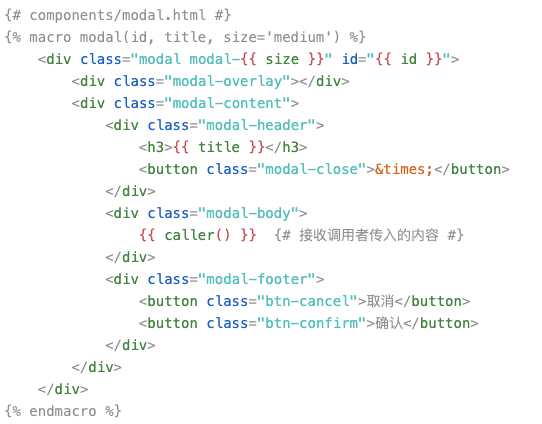
components/modal.html 定义模态框组件
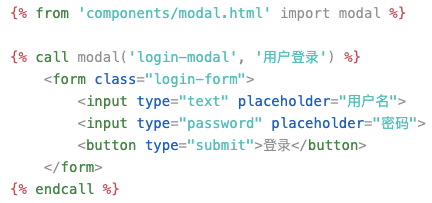
使用模态框组件:
包含——复用片段
product_card.html 创建可复用的模板片段:
<div class="product-card {{ 'featured' if product.featured else '' }}">
    <div class="card-header">
        <h3>{{ product.name }}</h3>
        {% if product.badge %}
            {{ product.badge }}
        {% endif %}
    </div>

    <div class="card-body">
        <img src="{{ product.image }}"
             alt="{{ product.name }}">
        <p class="price">¥{{ "%.2f"|format(product.price) }}</p>
        <p class="description">{{ product.description }}</p>
    </div>

    <div class="card-footer">
        <button class="btn-buy">立即购买</button>
        <button class="btn-detail">查看详情</button>
    </div>
</div>
包含模版片段:
<div class="products-grid">
    {% for product in products %}
        {% include 'product_card.html' %}
    {% endfor %}
</div>

<p>传递变量到包含的模板</p>
{% for product in products %}
    {% with product=product %}
        {% include 'product_card.html' %}
    {% endwith %}
{% endfor %}
↶ 返回首页 ↶